
DESIGN STUDIO WORK
Betty CHUYIN QI
U & BUTTERFLY
The location is in Royal Botanic Gardens Melbourne, Melbourne , Australia. This is a combination of nature and architecture. The materials it possesses are common, but they exist like shells. His terrain, like a butterfly, clings to the ground. He may not be visible sometimes, but sometimes he can be seen. As long as you step forward, or walk up the hillside. This is the ambiguity of nature and architecture
PARAMETRIC SPACE
Abstraction means to systematically develop a general solution suiting all individual components. It starts with some cases to develope the parametric solution to handle the cases. As for Reducton, according to Parametric Space, CAD domain, reduction can happen in defferent levels. In CAD system, higher level could be produced to the designer with more interesting change. It is more like a optimal way to transport the information instead of reducing it. Then, in Normalisation, for example. grasshopper could provides a model that could use graph cisually and make interaction between user and model is to adjust different number in grassopper. Next, this points could reform the new curve that doesn’t belong to one surface but at different levels.
CASE STUDY
The picture on the left is a unicorn business center designed by Zaha Studio, with coordinates in Chengdu and Sichuan. Since the case is built on a small island to sit on, its shape is more in line with the shape of the island, and has a Zaha-style curved landscape, so I thought of such a case to integrate the landscape of my design. It can be seen that some of the considered landscapes have transitioned to natural landscapes, I think this is a natural combination from nature to architecture. The picture on the right is the Harbin Opera House. First of all, because pavilion has the nature of performance, the case of finding the opera house is also very meaningful. In addition, the streamlined surface can well blend nature and Zaha-style landscape. At the same time, such a surface can also lay the foundation for the waffle structure I want to make. Combining the above two cases, I think how to integrate pavilion and land formed the most important step
 |  |
|---|
PART 1
Grasshopper and Matrix
The iteration matrix reflects the production process of a pavilion. For my design, I started with a few simple geometric shapes, and used different curves as the cutting point to change the height in the grasshopper, and finally formed a shell-shaped pavilion In fact, the changes in the first few parts are very easy. The most important thing is how to connect my body and the internal waffle support structure. I used offsets in both directions to create two thicknesses. Then make the inner thickness into waffle shape. And for another external thickness. Pufferfish is used to add some rich shapes to the surface In addition, it is also very focused to adjust the height of each curve. Because I use the divided curves of different ranges to increase the height of the series. In order to ensure that each curve is in the right position, I tried many times
 |  |  |
|---|


For the terrain part, I used the gray-scale terrain method to perfectly combine my terrain with the environment and buildings. First, I draw and color my plan in black and white. After ensuring the gray scale, importing the written gray scale terrain allows him to gradually form the height change I want. Through adjustment, my height is set within 2500mm, and the smoothness is level 4
 |  |
|---|
PART 2
Isometric & Diagram
Since my landscape is larger than pavilion, I need to think about controlling their proportions. In the iso chart, I mainly used the SW perspective to observe the entire design. First, SW can clearly reflect my landscape layout. Second, the SW direction is convenient for me to analyze the internal structure of pavilion with an explosion diagram.
In this picture, I mainly included landscape, materials and texture, as well as structural content. The purpose is to allow people to see my design ideas more clearly and intuitively.
I think the landscape and texture of iso are very important. Because in black and white, the most important purpose is to identify different materials. Therefore, the help of texture is more needed. In addition, the landscape is also very important for the formation of buildings. As you can see, some of my terrain is also undulating, so I have to mark their location with shadows and what kind of trees they have.
For the exploded part, I used a 1:25 ratio to represent pavilion, so that people can more clearly see the combination principle of the two structures inside and outside.

My circulation is divided into three levels, the first circulation (pavilion area), the second circulation (outdoor seating), and the third circulation (outdoor platform). These three circulations correspond to people with different needs. For example, some people do not want to enter the pavilion to appreciate, they can stand in the third circulation to listen to music, etc. For pavilion, his interior is also divided into two parts: rest and performance, which also correspond to different crowd densities.
Since my landscape is radial, I really want the wings of butterflies. Therefore, the transition space from the environment to the landscape is at the edge of the wings. And for outdoor and indoor spaces, there is also a transition space to guide people from outdoor to indoor

Image Title
TEXTURE AND MATERIAL
1. For pavilion and pedestal and landscape walls, I used Grc concrete textures and materials. In order to make my pavilion better integrate with the environment and does not look very heavy, GRC concrete material is a good choice. In addition, the color of grc can not be so dark, it seems that the atmosphere of the building will not be very tense.
2. For some ellipsoids that directly contact the ground, I used pearl granite. This can not only divert the crowd, but also simulate the rocks of nature and create a natural transition.
3. For the waffle part, I used the plywood material and adjusted the color to warm orange. Because
the color of concrete is white gray, the orange plywood can over-atmosphere and warm the interior space. And more suitable for performances and other indoor activities.
4. For the rest of the seat (including the interior of the pavilion), I used seasoned timber, the wood can be closer to nature. People sit on it and feel relaxed, it doesn’t look very cold


PART 3
Render Gallery & Post Processing
In render, as in my journal, I recorded how I divided the entire enscape rendering into several parts. Including, layering, material, environment, angle selection, etc.
Making Environment
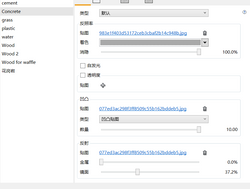
First of all, in the first step, my model has not distinguished materials, unified as plastic materials, but laid the foundation for my materials and lighting effects. Among them, I will combine the same material into a group first, so as to divide the layers late. The material is divided into four steps. First, add the desired material name to the material selector. Then enter enscape to choose your own texture, adjust the brightness and parameters. Use the mapping box to map the material to the surface of the object. Finally, adjust the uvw value and angle.
 |  |  |
|---|---|---|
 |  |  |
Select Render Image
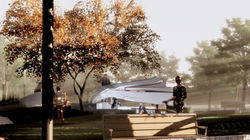
Since my pavilion is characterized by being connected to the terrain. So I set up people who sit and stand to achieve the effect of different terrain heights on them. Because pavilion mainly performs and watches, the types of people are more casua. For artificial light, I set him around the bench outside pavilion and the bottom of pavilion’s chair. Among them, a part of the light source is set up outside because my pavilion part is reflective paint. Therefore, such a light source forms diffuse reflection. In addition, because I want the whole atmosphere to be warmer, and people also have a sacred feeling in the performance, so I chose the internal light at the bottom.
|  |  |
|---|---|---|
 |  |  |

SELECTED IMAGE
Day Aug 15
Time: 7:36:05
This view could show different heights of pavilion
and landscape. It is easy to put the people in there
and see what is happening inside and outside of
the pavilion
SELECTED VIDEO CUT
1 From the road Time:7am
This site shows how pavilion looks like from road to site.By using
depth of field , it would be intersting to show how people look at it.
2 Back Time 8-11am
The Back of pavilion show the entrance of pavilion
3 Detail Time 11-13pm
Wood provides interior material and it is essential to show some
details
4 Interior Time 15-16pm
This angle of view is clear to show interior and main circulation area
5 Outer area Time 15-17pm
This view could tell how people sit on the outside of pavilion and
look at the performance from inside
6 Overall Site Time 17:30pm
Overall site shows how the whole pavilion including landscape
form the area
 |  |  |
|---|---|---|
 |  |  |
POST PROCESSING
In post-production, photoshop and video editor are mainly used. Using photoshop, I adjusted the atmosphere and some materials of the rendered image. Using the video editor, I added music and switching effects to make the video look more comfortable
In photoshop, I carried out the process of adding colors, adding plants and characters, and adding filters. In addition, I also brightened some shadow colors to make the building look slightly lower in contrast.

Contrast

VIDEO EDITING
I imported each scene separately into video editing software. First of all, I make the most peripheral video as the primary reference, and then I will sit in the second half of the video with the details and perspective. Secondly, I use text to add to make people more clearly understand the content of each frame of my video. In addition, I also added music as a background to make the whole picture look more vivid and emotional

PART 4
Section Model
In the section, first I created a 200*300*150 box, and adjusted a certain angle to the appropriate cut in surface, and used booleansplit to decompose the model. Among them, I need to switch the
different widths to the thickness suitable for the model and scale it. I used laser cutting to make the terrain, and the main building was 3D printed. During this period, the key issue is that the contour line required for laser cutting must be closed.

Exploded Section Model
1. Base for pavilion:
3D Print for GRC Concrete(Combined with 5)
2. Terrain:
White Mountboard(1mm) for Earth
3. Supporter for back bench:
White Mountboard(1mm) for GRC Concrete
4. Back bench:
3D Print for GRC Concrete
5. Stairs and bench inside of the pavilio:
3D Print for Timber(combined with 1)
6. Shell of pavilion:
3D Print for GRC Concrete
7. Waffle structure:
White Mountboard(1mm) for Plywood
In the process of conceiving the model, I hadto consider making some other materials intothe same material. For example, I divided the foundations of timber and pavlion into 3D printed parts, so that it can form a whole.
In addition to this, I also transformed the terrain. Because the spacing of a contourline of 1mm is relatively small, I superimpose two contourlines of the same shape to form a thickness of 2mm, so that each height difference is 2mm, and the height change in reality is 50mm, which is closer to the real
terrain. For the part to be joined, I will use UHU glue for bonding.

COMPONENT: WAFFLE STRUCTURE
The picture shows the laser cutting. In this page and step, we learned how to use another technology to build our waffle model. I chose Waffle part and Terrain part to set. In this process, we have several notice. The first one is that we should use different layers to identify which we shoud cut and which should only be labelled.Obviously, the text should be labelled and the edge of each shape should cut. Therefore, the text is shown red and cutting edge shows black. However, one of the edges in each shape should be labelled red as it is etch. Besides, I leave the gap between each other so that the laser cutting would be cut accuratly with each object. Also, I divide waffle into X and Y waffle part in oder to identify clearly and know to to make physical model. As for material, we should also add the name of material - Mountboard 1mm. Since each contour of my terrain is composed of two 1mm cut shapes, I only need to copy one of the cut combinations. In addition, I also added two 200*300 at the bottom for fixing.
 |  |
|---|
When bonding the terrain, I use UHU glue to align and stick each part
together. The reason why the terrain is made in this way is because contour lines can reflect the environment well, including the gentle slope, etc. Since each contour of my terrain is composed of two 1mm cut shapes, I only need to copy one of the cut combinations. In addition, I also added two 200*300 at the bottom for fixing For the Waffle part, I used grasshopper to first form a rectangular box in the center, and then used solid differece to cut off the excess part to form a gap. Only model, I can more easily go through it manually. Intersection with waffle: Laser cut with White Mountboard(1mm)
COMPONENT: SHELL CLADDING
Because some parts of 3d print is bigger. I use two types of Makerbot to print.O
ne is Replicator+ and another one is Replicator Z18(for stairs and foundation).
I divided it into three prints because my model is still relatively large.
In addition, I also divided my shell into three separate parts for printing, and
finally glued them together in waffle. The bonding material is still UHU
![3d print [Converted]_00.png](https://static.wixstatic.com/media/25016e_2d15556ea2c7401db66bc5f040482100~mv2.png/v1/fill/w_250,h_368,al_c,q_95,enc_auto/25016e_2d15556ea2c7401db66bc5f040482100~mv2.png) |  |  |
|---|---|---|
 |
APPENDEX GRASSHOPPER SCRIPT FOR WAFFLE

CONCLUSION
As the last digital design assignment, he taught us how to use parameters to abstract the model we want. This is another mode of thinking, using computer technology to achieve modeling. It fully embodies the structure that the computer calculates our shape through numbers, while using another language to teach us how to be responsible quickly. In addition, he is also a form of architecture, allowing us to appreciate the benefits and efficiency of modern architecture brought by parameterization
 |  |  |
|---|---|---|
 |  |